

An asset in Panopticum is what you actually keep an eye on: a vehicle, a site or a single camera. The Assets section gathers everything linked to it on one screen: the device with its track and speed, the site’s trunk, the cameras, the timeline and the readings. There is no need to look for the vehicle in Tracking and for its cameras on the video wall: pick the asset in the list, and it opens as a whole.
The section screen
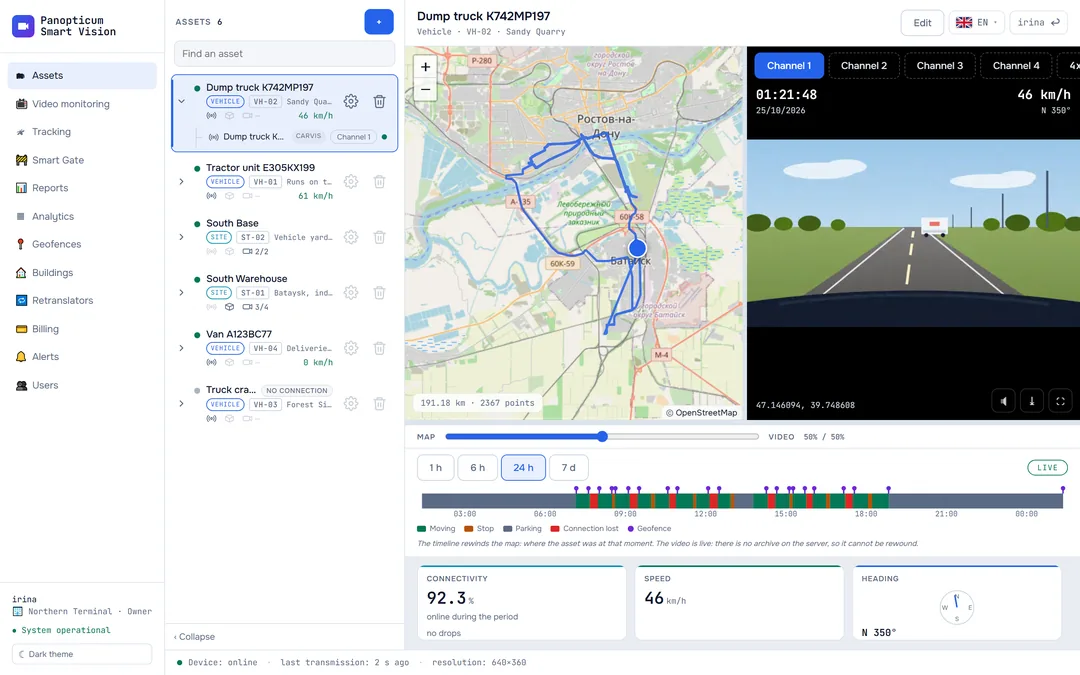
The asset list is on the left, the card of the selected asset on the right: the map and the video, with the timeline and the instruments below them. When you open the section, the first asset in the list opens by itself.

- Asset list: vehicles and sites
- Map: where the asset is now and where it went
- Video sources: DVR channels
- Timeline: driving, parking, connection drops
- Instruments: connectivity, speed, heading
- Edit the asset
Vehicle, site, point
Every asset is one of three kinds, and the card shows only what that kind can have:
| Kind | What it is | What the card shows |
|---|---|---|
| Vehicle | A vehicle with a tracking device | Position on the map, the track for the period, speed and heading, video from the DVR or cameras |
| Site | A warehouse, a depot, a construction site: a place with a trunk and cameras | A point on the map, the cameras, the trunk’s readings: temperature, load, external address |
| Point | A single camera with no device and no trunk | A point on the map and the camera’s video |
An asset can be added before its equipment arrives: linking a device, a trunk and cameras is optional. How to add an asset and what to link to it is explained in How to add an asset.
The asset list
An asset row has three lines of text: the name, then the kind, the code (for example, VH-02) and the caption, and below them the equipment counter and the vehicle’s speed.
- The dot by the name is green when the asset is online: any sign of life is enough, be it the device, the trunk or at least one camera.
- The equipment counter: a device icon, a trunk icon and the cameras as online out of total. A dimmed icon means the asset has no such equipment.
- The badge by the name is one of three: “alarm” (the device reports it itself), “catching up” (the device is uploading its stored history, more in How to connect a device) and silent N h or “no connection”. An asset silent for less than an hour gets no badge: a missed packet is not yet a failure.
The arrow on the left expands the row into an equipment tree: the device (labelled with its protocol: Carvis, Navtelecom, Wialon), the trunk and the cameras. Clicking a camera in the tree turns it on in the video window. The selected asset has its tree expanded already.

- Equipment counter: device, trunk, cameras online
- Equipment tree
- Edit and delete the asset
- Search by name
The search above the list looks through names, codes and captions. The “Collapse” button at the bottom hides the list to give the room to the map and the video. The cog and the bin in a row are visible to the account owner and operators: a viewer can only look at assets.
The map and the track
A vehicle stands on the map where its device sees it right now, and the blue line shows its path over the selected period. Under the map it says how many kilometres and points the track has. A site and a point stay in their places; if an asset has no coordinates, it is simply not on the map.
Video
Above the picture there are source buttons: the asset’s cameras and, for a Carvis DVR, its channels “Channel 1”, Channel 2 and so on. The first source turns on by itself: the first camera if the asset has cameras; if there are no cameras and the DVR is online, its first channel.

- Site cameras: a click switches the video
- Camera PTZ control
- Asset equipment: trunk and cameras
- A DVR channel works only while the device is online: the command to start the video goes over its connection. For an offline device the channel buttons are dimmed. Why the first picture from a DVR takes a while is explained in DVR video.
- A PTZ camera gets a control over the picture: arrows, zoom and stop. Details in PTZ cameras.
- If the source is lost, a test card takes the place of the picture with a caption saying what is going on (“Connecting”, “Waiting for stream”, No Signal), and the player keeps retrying by itself. There is no need to reload the page.
- There is no sound in the browser: the stream for the browser goes without an audio track.
The timeline
The timeline under the map shows what the vehicle was doing over the period: 1 h, 6 h, 24 h or 7 d. The colour of the band:
| Colour | State | How it is determined |
|---|---|---|
| Green | Driving | Speed above 3 km/h |
| Orange | Stop | The vehicle stands with the ignition on |
| Grey | Parking | The vehicle stands with the ignition off |
| Red | Connection lost | The device was offline |
A stretch shorter than two minutes does not count as a state: otherwise speed jitter of a standing vehicle would cut a day into thousands of pieces. The marks above the band show device alarms and geofence events.
Clicking or dragging along the timeline moves the vehicle on the map to the chosen moment, and the caption above the timeline shows that time. The LIVE button brings the map back to the present.
- LIVE. The map shows where the vehicle is now.
- Dragging along the timeline takes the vehicle back in time along the track; the time and state are shown above the timeline.
- A click on the timeline puts the vehicle at the chosen moment. The video stays live meanwhile: the clock in the frame runs on, and there is no video archive on the server.
- LIVE brings the map back to the present.
Instruments
Under the timeline there are tiles with readings. A tile appears only if the asset has a source for that number; there are no empty tiles with a dash.
- Connectivity: what share of the period the asset was online and how many times the device’s connection dropped.
- Speed and Heading: for vehicles.
- Voltage of the on-board power: for Navtelecom devices that report it.
- Temperature, CPU / memory, Cameras and IP address: for a site with a trunk.
The line at the bottom of the screen briefly repeats the main thing: whether the device or trunk is online and when the last transmission arrived.
How to split the screen
The border between the map and the video can be dragged with the mouse or with the slider between “Map” and “Video”; a double click splits it evenly again. The border between the upper part and the timeline with the instruments moves the same way. Your choice is remembered in the browser. If you give the whole screen to the map, the video turns off: there is nobody to watch it, and the vehicle’s connection should not be kept busy for nothing.
On a phone the card goes in a single column, and the map and video switch with the “Map” and “Video” tabs.

In the apps
Web
Everything described above. The section opens first after signing in.
Windows
The same list, card, timeline and instruments. The borders between the map, the video and the lower part are dragged with the mouse and remembered. The PTZ control is the same as in the browser. More in The Windows app.
Android
The asset list with the same equipment tree and the asset card: map, video, timeline and readings. More in The Android app.
Telegram
In the Telegram panel, Assets open first. A list row expands into a tree, the card shows the map, video and timeline; after scrubbing the timeline, come back with the LIVE button. More in A panel in Telegram.
If it did not work
- The list is empty. Assets are added by a person: the system creates none by itself. Press + above the list, see How to add an asset.
- The vehicle is not on the map. The device has not sent a single point with a satellite fix yet, or has been silent for a long time. Check the device using How to connect a device.
- A test card instead of video. Read its caption and look at How to connect a camera.
- The timeline is grey or red for the whole period. Red means the device was offline; the breakdown is in Tracking, the “Connectivity” panel.
See also
Found a mistake, or didn’t find an answer? Write to us on Telegram or send us a request, and we will reply and fix the article.